🌿 Why Use Plastic Bottles for Kale?
Plastic bottle gardening combines sustainability, space-saving, and accessibility. Instead of throwing bottles away, you can upcycle them into planters that are:
- Lightweight and portable
- Cost-effective
- Easy to stack or hang for vertical gardening
- Ideal for small-space urban gardening
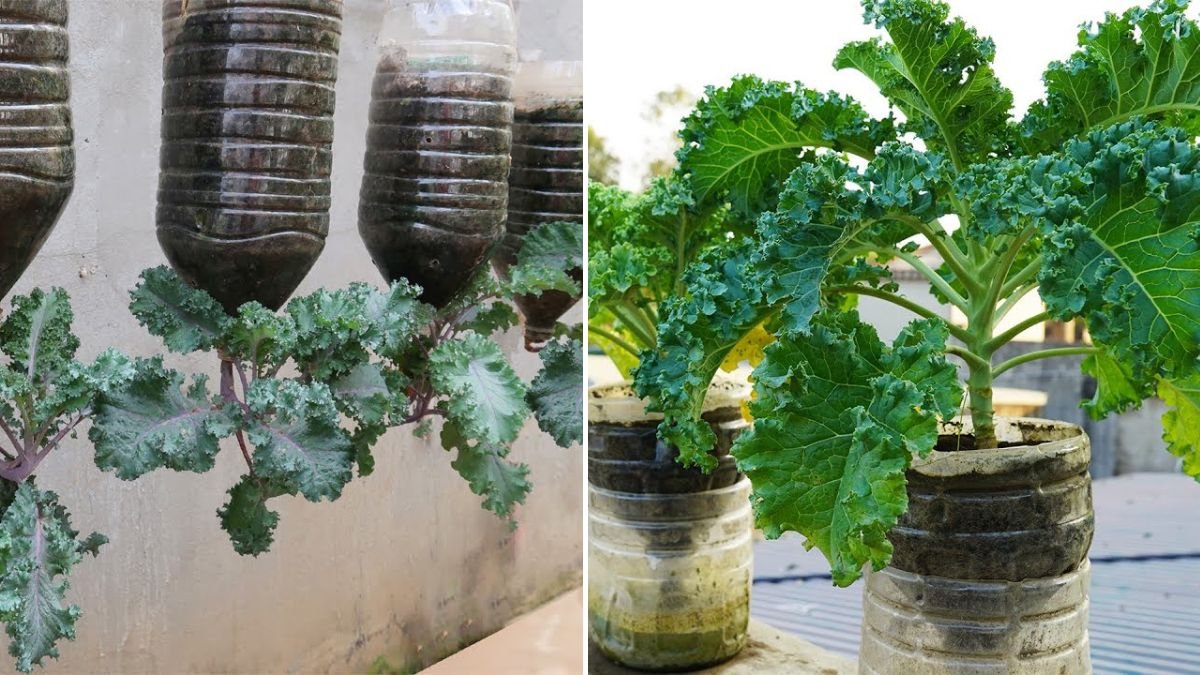
Bottle gardening has been gaining popularity on YouTube and other social media platforms, with gardeners demonstrating how these containers can successfully house a variety of vegetables, particularly leafy greens like kale. (youtube.com)
🥬 Why Kale is Perfect for Bottle Gardens
Kale is one of the most versatile and nutrient-dense leafy greens. It’s packed with vitamins A, C, and K, antioxidants, and fiber. It’s also remarkably resilient, thriving in cooler climates and adapting well to container growth. Key benefits of growing kale in a bottle include:
- Shallow roots that suit small containers
- Steady growth with minimal care
- Ability to harvest leaves progressively without killing the plant
Whether you choose curly kale, Tuscan (Lacinato) kale, or dwarf varieties, bottle gardening provides the right environment for consistent growth. (rhs.org.uk)
🪴 Step-by-Step Guide: Growing Kale in a Plastic Bottle
Here’s how to transform a simple plastic bottle into a thriving kale planter:
1. Prepare the Bottle
- Use a 1.5–2L plastic bottle.
- Cut off the top third to allow easy soil filling and planting.
- Punch several drainage holes in the bottom to prevent waterlogging. (childrensmuseumcuracao.org)
2. Add Soil and Nutrients
- Fill the bottle with a high-quality potting mix.
- Mix in compost or organic matter to provide essential nutrients for leafy growth.
- Kale prefers nutrient-rich soil and benefits from regular fertilization. (rhs.org.uk)
3. Plant Seeds or Seedlings
- Sow kale seeds at the recommended depth on the packet or transplant seedlings carefully.
- Space seeds to avoid overcrowding, ensuring each plant receives sufficient nutrients and light.
4. Water Consistently
- Container soil dries out faster than garden soil. Keep it consistently moist without overwatering.
- For convenience, consider a self-watering or wicking setup inside the bottle. (positivebloom.com)
5. Light and Location
- Position the bottles where they receive 6–8 hours of sunlight daily.
- If growing indoors, use grow lights to supplement natural light. (gardenerspath.com)
6. Fertilize and Maintain
- Feed kale every 2–4 weeks with a balanced, nitrogen-rich fertilizer.
- Monitor for pests such as aphids or cabbage worms, and take action promptly. (biologyinsights.com)
💡 Benefits of Plastic Bottle Kale Gardening
Growing kale in a bottle offers multiple advantages:
- Sustainability: Upcycles plastic bottles that would otherwise end up in landfills.
- Space Efficiency: Perfect for urban apartments or areas without a traditional garden.
- Accessibility: Easy to move, maintain, and harvest.
- Educational: A simple project for teaching children or beginners about plant growth and care.
With proper care, bottle-grown kale can produce leaves for several months, making it a continuous source of fresh greens for your kitchen.
🌱 Troubleshooting Common Issues
Even with careful setup, small container gardens can face challenges:
Dry Soil
- Small containers dry out faster. Mulch with straw or compost to retain moisture.
Pest Problems
- Aphids and cabbage worms can damage leaves. Regular inspection and organic pest control measures are recommended.
Nutrient Deficiency
- Container soil can deplete quickly. Fertilize regularly with compost or balanced liquid fertilizer to sustain growth. (gardeningknowhow.com)
Limited Sunlight
- If sunlight is inadequate, rotate bottles regularly or use supplemental grow lights.
📍 Background: Container Gardening Trends
Container gardening has become increasingly popular due to urbanization, limited outdoor space, and environmental awareness. Kale is particularly suited for containers because:
- It grows well in shallow soil
- It thrives in cooler weather
- It provides a continuous harvest of nutritious leaves
Repurposing bottles adds an eco-friendly twist, aligning gardening with sustainability goals. (rhs.org.uk)
🌟 Tips for Maximizing Growth
To ensure your bottle kale thrives:
- Choose high-quality potting mix and compost for nutrients
- Keep soil evenly moist and avoid overwatering
- Fertilize regularly to maintain leafy growth
- Inspect plants frequently for pests or signs of stress
- Rotate bottles to ensure uniform sunlight exposure
These small steps make a significant difference in container vegetable gardening success.
📚 Authoritative Sources for Readers
Provide readers with credible resources for further guidance:
- RHS Grow Your Own Kale Guide — Practical advice for planting and care: RHS Kale Guide
- Gardeners’ Path Container Kale Instructions — Step-by-step instructions for growing leafy greens in containers: Grow Kale in Containers
- Plastic Bottle Garden Instructions — Upcycled planter ideas: Plastic Bottle Gardening
These sources provide expert insights for gardeners seeking reliable guidance.
🌟 Final Thoughts
Growing kale in a plastic bottle is eco-friendly, cost-effective, and highly rewarding. It’s perfect for urban gardeners or anyone seeking a simple way to grow their own nutritious leafy greens. By following these steps — from cutting bottles and adding soil to proper watering, sunlight, and feeding — you can create a thriving mini garden right on your balcony, windowsill, or patio.
This DIY method promotes sustainability, self-sufficiency, and educational opportunities while making the most of recycled materials. Whether you are a beginner or an experienced gardener, bottle-grown kale is a practical and fun way to enjoy fresh, homegrown greens all year round.
With [FOCUS KEYWORD], every plastic bottle can transform into a productive, lush, and beautiful kale planter — giving you fresh leaves while reducing environmental waste. Start small, care consistently, and watch your mini kale garden thrive!